Table of contents
Introduction
Hey guys! Learning is best when we learn something in a fun way. So, in this article, you'll be learning about the basic concept of DOM and DOM Manipulation using javascript. I've created a basic application using HTML, CSS and JS which helps you to ask out your crush 😂 ( Valentine is near Nerds ) and you'll also understand the basic concept of DOM Manipulation. So, let's get started.
What is DOM?
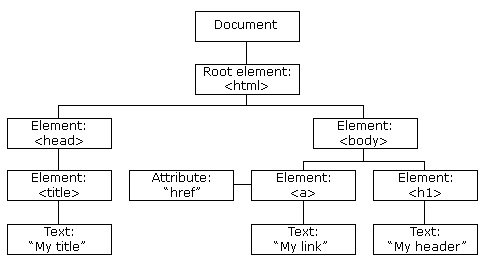
If we go by its full form then DOM stands for, Document Object Model which is a tree like struckture in which our HTML page is rendered.

So, this diagram here represents what a tree like structure is meant in HTML rendering. <html> is considered as our root element which has <head> , <body> as its node elements and so on.
What is Dom Manipulation?
Now you know you can define your elements in your HTML file. All of your tags in HTML like image tags, anchor tags, etc. along with the CSS you can define in your HTML file. But there also exists a phenomenon in Javascript in which with the help of it you can manipulate your DOM as per your requirements. This is called DOM Manipulation.
Application
All of the code you can find in this repo.
I've created an HTML file, which has an h1 tag and two buttons.
<button class="btn-pushable" role="button" id="yes">

<button class="btn-pushable" role="button" id="no">
These are the two buttons which we've created. Please note the ids of both of these buttons ( "yes" and "no" ). We will be using these ids to make some changes in our DOM using Javascript.
Now, create a JS file (index.js here) and include it in your HTML file.
Now before moving on to the DOM Manipulation part, let me tell you something about the document object in javascript. A JavaScript document object is an object that provides access to all HTML elements of a document. When an HTML document is loaded into a browser window, then it becomes a document object. The document object stores the elements of an HTML document, such as HTML, HEAD, BODY, and other HTML tags as objects.
Now let's move on to our index.js file.
let yesBtn = document.getElementById("yes");
let noBtn = document.getElementById("no");
Here, we're using the getElementById method provided by our document object. Now both of your variables have the reference of their respective elements (buttons here) and we'll use them to manipulate our DOM.
Now, we'll be using addEventListener method provided by the document object. addEventListener method expects two parameters. First parameter is an 'mouseevent' and second parameter is a callback function.
yesBtn.addEventListener('click',()=>{
    window.alert("Wohoo! Let's meet on Saturday Night!!!")
})
Like in this code snippet, you are adding an event listener to your button with id "yesBtn". Here the event is a mouse click and the callback function is an anonymous function which will show an alert box on the screen. Here are more event listeners which we're using in our index.js file.
noBtn.addEventListener('click',()=>{
    window.alert("Wohoo! Let's meet on Saturday Night!!!")
})

noBtn.addEventListener('mouseover',()=>{
    noText.innerText = "Yes"
    yesText.innerText = "No"
})

noBtn.addEventListener('mouseout',()=>{
    noText.innerText = "No"
    yesText.innerText = "Yes"
})
First addEventListener in this snippet is the same as we discussed before in the "yesBtn" id case.
Now in JS we've a lot of mouse events which we can use to manipulate our DOM or in any other logic. So, mouseover and mouseout are two such events. mouseover will trigger when we'll hover on out No button and mouseout will trigger when we come out of the No button element. So this is about the mouse events in these event listeners, now in the callback functions we're using innerText property which is used to change the text of the element which we're referencing to.
This was about the technical part about event listener no the fun part is whenever the person will click on YES button they'll get our desired alert. But when the try to click on NO button, as soon as, they entered the No button element the text in No will change to Yes and when they come out the text will change to Yes which will confuse the person and they'll never can NO to your proposal 😂.
So, are you getting a Valentine this year? LOL.
Thank you guys for reading my blog and yeah pardon me for any mistakes. PEACE🤞

